Illustrated by Lisa Cinelli
What is a picture book?
Traditionally 32 pages long, a picture book is a three-dimensional object meant to be held, often shared, while turning pages to reveal a story through picture sequences with a beginning, middle, and end in words and pictures. Even with a wordless picture book, the illustrations “tell” a story.
A picture book needs to be “seen”. A true picture book cannot be read over the radio and be fully understood because the words in a picture book say only what the pictures cannot show. Both the words and the pictures need to be “read”. The pictures add information and description not found in the words. Readers and nonreaders ask, “Whatʼs happening here?” and “What happens next?” When the action moves to the right, the reader is compelled to turn the page.
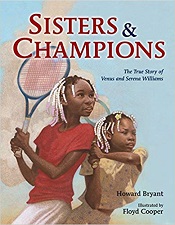
Illustrated by Floyd Cooper
Why is it helpful to make a picture book dummy?
A picture book dummy is a three-dimensional work-in-progress to organize the text, illustrations, pacing and rhythm as a prototype for the final, published picture book. A tool useful for authors as well as illustrators, time spent making picture book dummies produces carefully planned, edited, and revised words and pictures that are at the core of creating the best picture books possible.
A creative and well-planned picture book dummy can sell a book project to an art director, agent or editor. Before making a picture book dummy, an illustrator reads and rereads the text many times, making thumbnail sketches and then a story board. Usually created on a single sheet of paper, a storyboard gives a greatly reduced, two-dimensional overview of the entire book. The illustrator is not concerned with details or color at this time. The overview is to see the shape of the book as it flows from page to page.
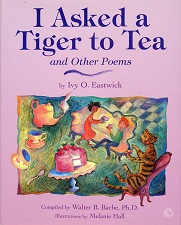
Illustrated by Melanie Hall
What you need to make a picture book dummy:
-
- Your manuscript text, typed out and double spaced (you can also use text from a published book, for practice.) You will be cutting and taping the text into the picture book dummy.
- Scissors
- Long armed stapler, needle and thread or a local tailorʼs sewing machine services
- Scotch “Magic” tape (when making decisions, the taped text will be easily moved from page to page with the “Magic” tape)
- Eight sheets of copy paper/computer paper. Your dummy can be different sizes, but a picture book dummy using a picture book trim size will show the text and illustrations to better advantage, and not look like a novelty book.
- For an 8” wide x 10” high picture book trim size, you will need eight sheets of copy paper/computer paper 16” wide x 10” high. Trim 17” wide x 11” high paper to the correct size.
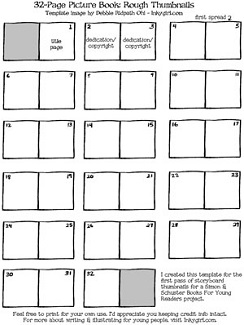
Author/illustrator Debbie Ridpath Ohi has a free picture book thumbnail template available on her website.
How to make a picture book dummy:
Fold the eight sheets of paper in half. Staple or sew the eight pages together on the center fold. You now have a 32-page picture book dummy with single pages, pages 1 and 32, and fifteen double page spreads. The cover and endpapers are not included in the dummy.
Once folded, begin numbering the pages with page 1. On the back of page 1, continue numbering the pages with page 2, page 3, etc. Odd number pages should be on the right side of each double page spread. The odd number page is the page the reader will turn to find out whatʼs going to happen next in the story.
The center fold is the “gutter” of the book. It is a space to avoid placing text or art because when the book is printed, at least 1/2” on each side of the gutter can be caught up in the bookʼs printing and binding.
The front matter of the book needs to be considered before beginning the text. Looking at many picture books will give a variety of options on how artists and designers handle the information and the space. Text and illustrations are not so restricted to particular pages in todayʼs books, but it could be helpful to start traditionally:
Page 1: Half-Title page (Only the title, with perhaps an illustration)
Page 2: Blank
Page 3: Full-Title Page (author, illustrator, and publisher. An illustration can cross the
double page spread from Page 2 to Page 3)
Page 4: Copyright Page
Page 5: Dedication Page
Page 6: Blank
Page 7: Story Begins
Note: if you want more pages to tell your story, you can consolidate a bit:
Page 1: Full-Title Page (author, illustrator, and publisher)
Page 2: Copyright Page
Page 3: Dedication Page
Page 4: Blank
Page 5: Story Begins
In reality, the publishing details such as title, author, illustrator, publisher, copyright, and dedication need to be included in the book, but the design and production of picture books has creatively explored and expanded placement of the publishing info. Youʼll see a variety of options the more you look at picture books, especially more recently published picture books.
The next step is focusing on the pacing of the words and pictures. Now is the time to use the thumbnails and storyboard ideas to map out the pages of the book. Cut out your text and tape it into place. You want your book to be a page turner!
Reviewing your picture book dummy:
Here are some things to consider:
-
-
- Are you left with extra pages–does your story peak too early? You might have too much action at the beginning of the story. The peak of the story should happen around page 30-31.
- Are some pages text heavy, leaving little room for the illustrations? Do you have enough illustrations? There should be at least 13 double-page spreads of illustrations for the story, and page 32 can have a single sentence or spot illustration.
- Vignettes, double-page spreads, single-page spreads, panels, etc. are all available for your page designs. Does the art move the story forward? Is the reader invested in the character and the story line set up at the very beginning of the book? What happens along the way? Disappointment, achievements, change for the main character?
- Does your ending tie together with the beginning in a satisfying connection, a surprise, but not inevitable conclusion? Does your reader care?
- In 25 words or less, what is your story about? If you keep saying, “and then…”, you probably have more than one story, more than one picture book.
- Is there clarity and readability on each page? If an action is confusing, it will stop the reader and the rhythm and the flow of the story is affected.
-
Authors and illustrators can create numerous dummies for a single book project. Often no one else will see your dummies, but by seeing your text and images in a picture book dummy can reveal opportunities for you to tighten and revise the words and pictures to better tell the story.
Resources:
Paul, Ann Whitford. Revised and Expanded Edition Writing Picture Books A Hands-On-Guide from Story Creation to Publication. Cincinnati: Writerʼs Digest Books, 2018.
Salisbury, Martin. Illustrating Childrenʼs Books Creating Pictures for Publication. London: Quarto Publishing, 2004.
Shulevitz, Uri. Writing with Pictures How to Write and Illustrate Childrenʼs Books. New York: Watson-Guptill Publications, 1985.
Withrow, Steven and Lesley Breen Withrow. Illustrating Childrenʼs Picture Books: Tutorials, Case Studies, Know-how, Inspiration. Cincinnati: Writerʼs Digest Books, 2009.